Android application
Use the android/app product type in a module to build an Android application.
Using IntelliJ IDEA?
Make sure to install the Android plugin to get proper support for Android-specific features.
Module layout
Here is an overview of the module layout for an Android application:
my-android-app/
├─ assets/ # (1)!
├─ jniLibs/ # (2)!
│  ╰─ arm64-v8a/
│     ╰─ libfoo.so
├─ res/ # (3)!
│  ├─ drawable/
│  │  ╰─ graphic.png
│  ├─ layout/
│  │  ├─ main.xml
│  │  ╰─ info.xml
│  ╰─ ...
├─ resources/
├─ src/
│  ├─ AndroidManifest.xml # (4)!
│  ╰─ MainActivity.kt # (5)!
├─ test/
│  ╰─ MainTest.kt
├─ module.yaml
╰─ proguard-rules.pro # (6)!
assetsandresare standard Android resource directories. See the official Android docs.- Pre-compiled native libraries (
.sofiles) organized by ABI (e.g.arm64-v8a,x86_64). See the official Android docs. assetsandresare standard Android resource directories. See the official Android docs.- The manifest file of your application.
- An activity (screen) of your application.
- Optional configuration for R8 code shrinking and obfuscation. See code shrinking.
Entry point
The application's entry point is specified in the AndroidManifest.xml file according to the
official Android documentation:
<manifest xmlns:android="http://schemas.android.com/apk/res/android">
  <application>
    <activity android:name="com.example.myapp.MainActivity" android:exported="true">
      <intent-filter>
        <action android:name="android.intent.action.MAIN" />
        <category android:name="android.intent.category.LAUNCHER" />
      </intent-filter>
    </activity>
  </application>
</manifest>
Running your application
You can run your application using the kotlin run command.
It installs and starts the application on a connected device or emulator, starting a new emulator if necessary.
There are no prerequisites for this. All the required tools, including the Android SDK, will be provisioned if not present (you will need to accept licenses).
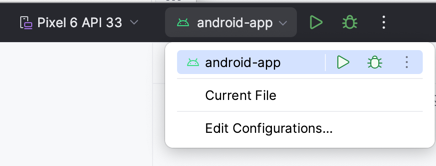
Run in IntelliJ IDEA
IntelliJ IDEA with the Kotlin Toolchain plugin automatically detects the android/app product type and provides a run
configuration for it:
Packaging
You can use the build command to create an APK, or the package command to create an Android Application Bundle (AAB).
The package command will not only build the AAB, but also minify/obfuscate it with R8, and sign it when signing is
enabled. See the dedicated signing and code shrinking sections below to learn how to
configure this.
For example, build an AAB for the android-app module with:
kotlin package -m android-app
For an android/app module, the Android platform, AAB format, and release variant are selected automatically. The
command prints the path to the generated AAB. For a module named android-app, the default path, relative to the
project root, is:
build/tasks/_android-app_bundleAndroid/gradle-project-release.aab
Note
This path is temporary: the build artifact layout will be revised in a future release. Use the path printed by the command to locate your bundle.
Resolving duplicate Java resources
Dependencies can package Java resources under the same path. If Android packaging fails in MergeJavaResWorkAction
with an error such as 2 files found with path ..., use settings.android.resourcePackaging to tell the Android
packager how to handle the conflict.
For example, the following configuration excludes a duplicated resource from the APK:
settings:
  android:
    resourcePackaging:
      excludes:
        - META-INF/versions/9/OSGI-INF/MANIFEST.MF
Choose the rule that matches the resource's semantics:
excludesomits matching resources from the APK.pickFirstspackages only the first matching resource.mergesconcatenates all matching resources into a single APK entry.
The values are glob patterns accepted by Android's
Packaging.Resources
API. See the resourcePackaging reference for all
available options.
Filtering native library ABIs
An Android package may carry pre-compiled native libraries (.so files) grouped by
ABIs, and by default it carries every ABI it can find.
Native libraries come from two sources: the module's own jniLibs directory, and those
dependencies of the module that contain native libraries, each bringing the ABIs it was built for. Most dependencies
contain none at all, but the ones that do could have different ABIs coverage.
This matters because Android picks a single ABI per installation: it takes the first entry of the device's supported
ABI list that is present in the package, and then only that one lib/<abi>/ directory is used. If an ABI doesn't
carry every mandatory native library that the other ABIs carry, the app might fail at runtime with UnsatisfiedLinkError on every
device that selects it.
The Kotlin Toolchain warns when it packages ABIs with inconsistent native libraries, reporting which ABI is missing which library.
Use settings.android.abiFilters to package only the ABIs that all of your native libraries support:
settings:
  android:
    abiFilters: [ arm64-v8a, x86_64 ]
Only the listed ABIs are packaged; any other lib/<abi>/ directory is dropped. Narrowing the list to ABIs whose
native libraries are all present makes the package consistent, which silences the warning.
Sometimes an ABI is incomplete on purpose because the missing library is optional: your code guards the call to
System.loadLibrary and degrades gracefully when it isn't there. Only you can know that, which is why this is
reported as a warning rather than an error.
The check runs whether or not you selected the ABIs yourself, since selecting them says nothing about the consistency of the libraries behind them: a dependency you add later can make a previously fine selection incomplete.
Code shrinking
When creating a release build with the Kotlin Toolchain, R8 will be used automatically, with minification and shrinking enabled. This is equivalent to the following Gradle configuration:
// Gradle equivalent of the Kotlin Toolchain's defaults
isMinifyEnabled = true
isShrinkResources = true
proguardFiles(getDefaultProguardFile("proguard-android-optimize.txt"))
You can create a proguard-rules.pro file in the module folder to add custom rules for R8.
├─ src/
├─ test/
├─ proguard-rules.pro
╰─ module.yaml
It is automatically used by the Kotlin Toolchain if present.
An example of how to add custom R8 rules can be found in the android-app module of the compose-multiplatform example project.
Signing
Enable signing in android-app/module.yaml to sign the release AAB during kotlin package -m android-app:
settings:
  android:
    signing: enabled
Create android-app/keystore.properties next to android-app/module.yaml:
android-app/
├─ module.yaml
╰─ keystore.properties  # create this file
Add the signing details to that file. Set storeFile to the name of the keystore to create in the same module directory:
storeFile=release.keystore
storePassword=REPLACE_WITH_STRONG_STORE_PASSWORD
keyAlias=alias
keyPassword=REPLACE_WITH_STRONG_KEY_PASSWORD
Replace both password placeholders with your own strong passwords before generating the keystore.
From the android-app directory, generate the keystore using the values in keystore.properties:
kotlin tool generate-keystore --properties-file keystore.properties
The tool creates android-app/release.keystore; do not create it beforehand. When you build the AAB, the signing
configuration reads android-app/keystore.properties and uses android-app/release.keystore to sign the bundle. A
relative storeFile path is resolved from the module directory, so run generate-keystore from there as shown above.
Keep the signing files secure
Add release.keystore and keystore.properties to your Git ignore rules. Never commit either file to version
control. Back up both files in a secure location.
Losing the upload key requires an upload-key reset in Google Play Console.
Note
You can also pass in these details to generate-keystore as command line arguments. Invoke the tool with --help
to learn more.
Publishing
Publish an android/app module to Google Play as a signed Android App Bundle (AAB). You need a Google Play Console
developer account.
Configure the application
Set a unique application ID and an initial version in android-app/module.yaml:
product: android/app

settings:
  android:
    applicationId: com.example.myapp
    versionCode: 1
    versionName: "1.0"
The applicationId uniquely identifies the application in Google Play and cannot be changed after you upload the
first artifact.
Before uploading the application:
- Prepare signing: create
android-app/keystore.propertiesand generate the upload key inandroid-app/release.keystore. - Package the application with
kotlin package -m android-app. This produces a signed release AAB and prints its path. Use that AAB for the upload.
Upload the bundle
If you haven't created the application yet, open Google Play Console and select Create app to set it up before uploading your first bundle.
Open the application in Google Play Console, go to Test and release, and select the appropriate testing or
production track. Create a release and upload the generated .aab file.
Google Play validates and processes the bundle before making the release available to testers or users.
For future uploads
Increase versionCode in android-app/module.yaml before every new upload: Google Play rejects bundles with a
previously used version code. Update the user-facing versionName when publishing a new application version.
Build from IntelliJ IDEA or Android Studio
Generating a signed bundle from Build | Generate Signed App Bundle or APK is not supported for Kotlin Toolchain projects yet. Use the Kotlin CLI to create the AAB.
Parcelize
If you want to automatically generate your Parcelable implementations, you can enable
Parcelize as follows:
settings:
  android:
    parcelize: enabled
With this simple toggle, the following class gets its Parcelable implementation automatically without spelling it out
in the code, just thanks to the @Parcelize annotation:
import kotlinx.parcelize.Parcelize

@Parcelize
class User(val firstName: String, val lastName: String, val age: Int): Parcelable
While this is only relevant on Android, sometimes you need to share your data model between multiple platforms.
However, the Parcelable interface and @Parcelize annotation are only present on Android.
But fear not, there is a solution described in the
official documentation.
In short:
- For
android.os.Parcelable, you can use theexpect/actualmechanism to define your own interface as typealias ofandroid.os.Parcelable(for Android), and as an empty interface for other platforms. - For
@Parcelize, you can simply define your own annotation instead, and then tell Parcelize about it (see below).
For example, in common code:
@Target(AnnotationTarget.CLASS)
@Retention(AnnotationRetention.BINARY)
annotation class MyParcelize

expect interface MyParcelable
actual typealias MyParcelable = android.os.Parcelable
// empty because nothing is generated on non-Android platforms
actual interface MyParcelable
You can then make Parcelize recognize this custom annotation using the additionalAnnotations option:
settings:
  kotlin:
    # for the expect/actual MyParcelable interface
    freeCompilerArgs: [ -Xexpect-actual-classes ]
  android:
    parcelize:
      enabled: true
      additionalAnnotations: [ com.example.MyParcelize ]
Google Services and Firebase
To enable the google-services plugin, place
your google-services.json file in the module containing an android/app product, next to module.yaml.
╰─ androidApp/
   ├─ src/
   ├─ google-services.json
   ╰─ module.yaml
This file will be found and consumed automatically.